Monday, February 24, 2014

Painted Kitchen Cabinets. Diy $75

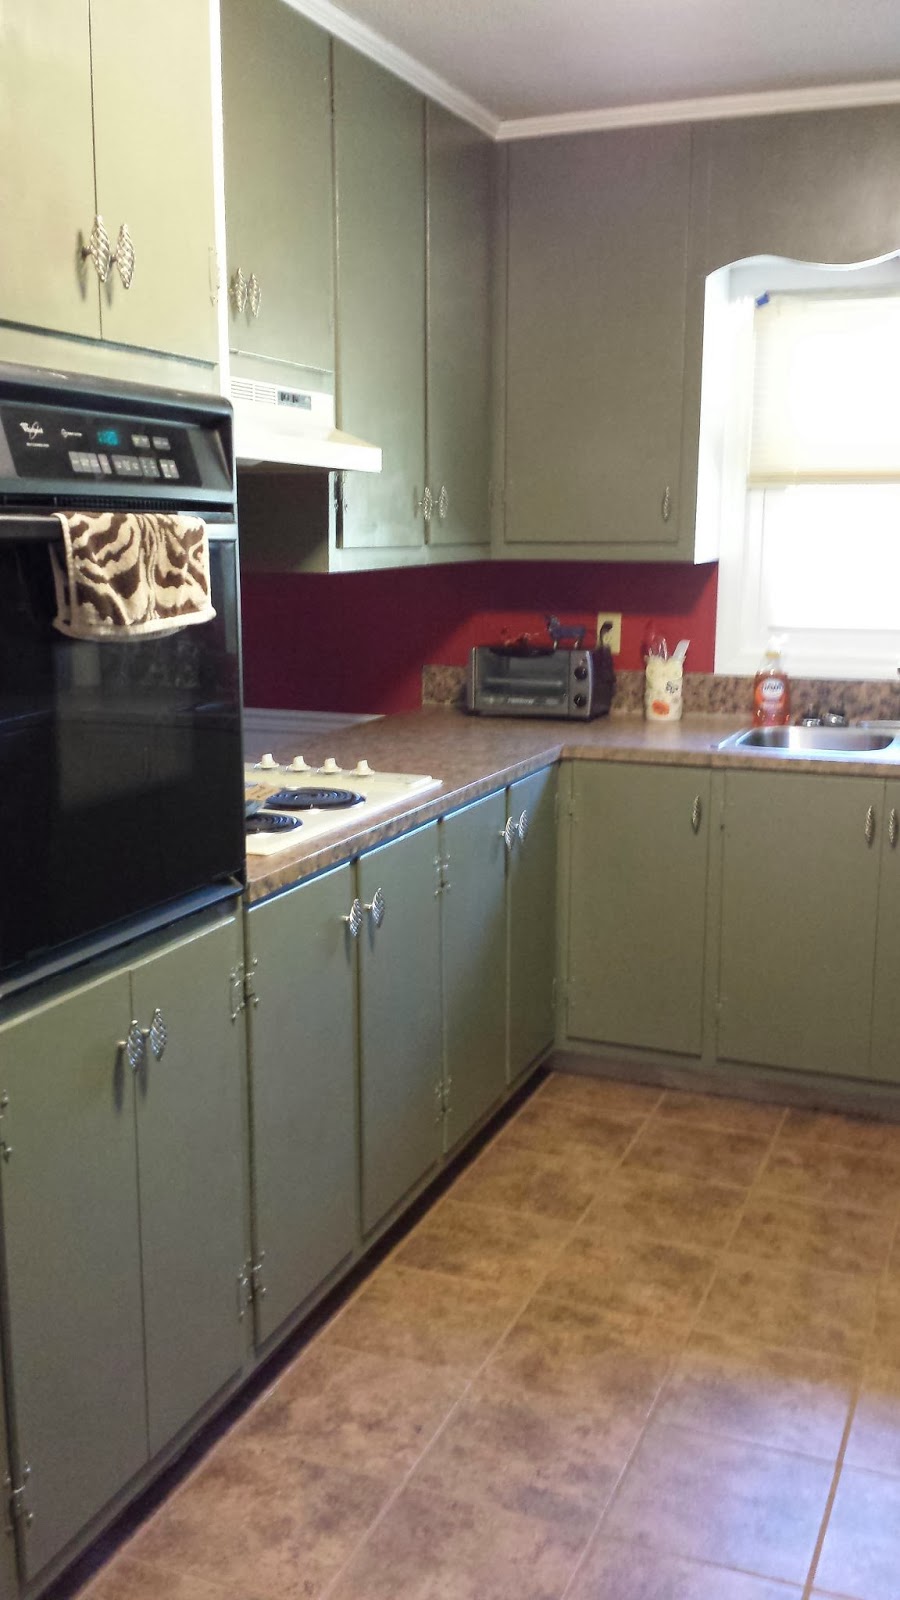
Hey yall. A few weeks ago I finally broke down and painted my 1960s oak kitchen cabinets. I used a sage wall paint that I already owned in eggshall. Well first I painted the cabinets white, I always wanted white cabinets but once I did it just didnt go well in my kitchen.  So I had been looking on pinterest and I really liked the green cabinets I have been seeing. So I just went for it. I first removed all the old knobs, I then cleaned them very good with warm water and dish soap,  then I sanded them and wiped them down again.  Next I primed the cabinets. Then I painted about three coats of the green hours in between coats (I kept the doors on ...it would have been easier if I would have taken them off but you can't tell me nothing) I used a paint brush for the base of the cabinets and hinge area and a cabinet door roller for the cabinet doors. After that I took a tiny craft paint brush and painted around the hinges again for a good cover. I then added about four coats of polycrylic to the cabinets and it protects the paint as well as gives them a good shine. I posted the original knobs on ebay and sold them and used that money for the the new hardware I also found on ebay. Brushed nickel hardware at lowes or a hardware store was going to cost over $100 and I got mine on ebay for $50 score!! I am happy with my cabinets and found it super easy and cheap. The color I used is Valspar 4000 latex paint eggshell and its called Autumn Grey but its a sage color. Kiltz latex primer and polycrylic all purchased from lowes. It would cost about $75 to do it with all the supplies. Any questions let me know. Happy Monday yall. I need to get my housewife duties done. :)

Sunday, February 23, 2014

Faux granite countertops $60

So as I have mentioned before we bought a house in September and the whole house needed work but the kitchen is always the main focus where people want a update right? Well I have been looking at stained white laminate counters for months... I should have done something sooner but lord I can't get nothing doing during football season.  (Go Carolina Panthers!! ♡) Well since we were knocked out of the playoffs by those stupid 49ers it was time for me to focus on the house again. First I watched countless youtube videos and read various blogs to see how other people updated their counters the most reasonable thing for me was the faux painted granite counters.  So here is how I did it. First buy the supplies. You will need  Paint trays for primer and polycrylic . Sandpaper the less grit the better in my opinion, primer we always use kiltz, base coat I used a tan wall paint, accent color's in acrylic paint from Michaels or walmart a few different colors and I recommend two of each to be safe, polycrylic sealer for the finished coats,  sponges,  paper plates or old disposal ones, I also used a small door roller for the primer and sealer. Tape off appliances and walls. First clean the counters then sand them to have a smooth surface,  clean again and dry ...now prime and I let mine sit overnight. In the morning I added a light tan thin coat of wall paint I found on the clearance rack at lowes for $13 (most people just use the darkest acrylic paint black or chocolate for the base kind of wish I had done that.) After the base coat cut the sponge in pieces for the different colors, then start with the darkest color I used black and started sponging it on all over almost covering the counters, then I started with the brown I had chose, then I mixed a light grey and white and barely used it all over until it started seeing a pattern I liked. It will look crazy at first deep breaths don't freak...I did. After you have reached your desired look you are happy with I added my first coat of polycrylic and I used six coats I did mine over a two day period... do not sit anything on the counters for a few days and get water or wetness up immediately. Also after the first two coats of polycrylic I lightly sanded the counters to have a even coat all over. The crack to the wall to the back was harder for me to do for some reason. Get as close as you can around sink. I am happy with the results but to me anything would have been better than the stained 1960s counters. I have had them for about two months now almost and they hold up well just make sure as I have said to get water up asap. I couldn't be happier with the results. I hope this is helpful and happy diying. Any questions feel free to ask. Have a great day yall. P.s. I painted my cabinets too blog on that next... 

Saturday, February 22, 2014

Diy EAT letters

Today I went to Michaels and finally started on one of my million pinterest projects. Am I the only one absolutely obsessed with pinterest?  I wish I could pin and diy for a living lol don't we all. Any who, on my trip to Michaels I purchased three wooden letter $2.99 a piece,  mod podge, a little set of paint brushes with sponges $1.49 , my choice of paper .49 and the grey color I already had from the counters which I will post a blog on that this week. I recommend to first sand the edges of the letters depends on the letters mine had tiny ruff spots. Step two paint the edges and a light coat in the center, then add two more coats or desired amount.  Third add a good layer of paint on the center of the letter and stamp it on the back of the paper of your choice.  Then cut it out and add some mod podge to the center and press. Boom then let it sit add a hole in the back and hang it where you please. Presto diy personal wall art.  I believe I will do more soon of our last name. Well yall the hubs is snoring and I'm watching my King of Queens dvds nighty nite. (I know we are such party animals) ♡

Tuesday, February 18, 2014

Our first house

Well we bought a house in September of 2013. We have only been here a few months and we have already made so many changes to our 1960s house. When we viewed the house I was a little hesitant at first but I see potential in most things and it was a heck of a deal. The walls were dark panel, yellow stick down tile floor that was in awful shape, dirty carpets, and dark oak kitchen with white counters. It for real looked like 1960s yuckkkk! We have done a lot of improvements and I have completed most of them myself, my poor husband works alot so I have learned to do home improvements thanks youtube and the almighty Pinterest ♡. Our first project was painting all the walls and let me tell you painting panel makes a world of difference however it is more complicated to paint due to the cracks and coating to cover the panel. I first started with Kiltz primer I purchased at lowes and then the fun part picking out paint for the rooms. Pictures coming soon. 
P.s. red is a hard color to paint several coats. Fyl. Happy Saturday.

Just Savannah

Hello. I'm Savannah. I am a southern mom of two wonderful boys and wife to the man of my dreams. I have been married almost ten years and have spent most of the past few years being a mom and housewife. I started a blog about a year ago but couldn't remember how to access it opps ! Any who you will see that I love all things crafty and diy. I enjoy taking pride in making things myself but who doesn't right? I am a die hard huge Carolina Panthers fan. I made this blog to share my secrets on clean eating, decorating, crafts and remodeling my house by my self for the most part. Hope yall enjoy.